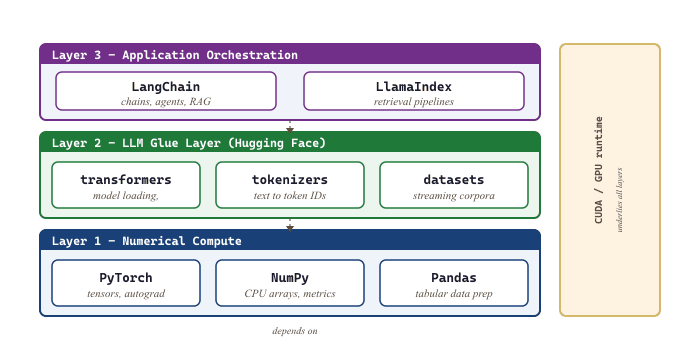
The library layer is where ideas become runnable code. Part I sits on four kinds of library: a deep-learning engine (PyTorch, with JAX as the secondary option), a numerical substrate (NumPy and SciPy), a classical-ML reference (scikit-learn), and a tokenizer layer that bridges raw text to integer IDs. Every model in the rest of the book is built from these primitives, so it pays to know which library owns which concern.
5.2.1 The deep-learning engine
PyTorch 2.x is the default. Versions 2.0 and later add torch.compile, which JIT-compiles a model graph to a faster fused kernel sequence; for most models you get a 30 to 60% speedup with a one-line change. The 2025-26 default for inference is torch.compile(model, mode='reduce-overhead'), which reuses CUDA graphs across calls. PyTorch 2.5+ ships native FlashAttention through scaled_dot_product_attention, so attention kernels are no longer a separate install; the only reason to install flash-attn separately in 2026 is the FA3 backwards kernel for training. For edge deployment, PyTorch 2.6+ torch.export produces a portable graph artifact that runs on mobile / browser runtimes.
JAX is the second engine you should know about, even if you do not use it in Part I. Research papers from Google DeepMind, Anthropic, and EleutherAI increasingly publish JAX implementations alongside PyTorch ones. The combination of jax.jit, jax.vmap, and jax.shard_map (the JAX 0.5+ replacement for the older pmap) makes parallelization more explicit than PyTorch and the resulting code is often easier to reason about for novel architectures. The trade-off is a smaller ecosystem and a steeper learning curve.
On NVIDIA H100 / H200 / B200 hardware, serious post-2024 pretraining stacks add transformer-engine (NVIDIA, 2023) for FP8 training, which roughly halves memory and compute relative to bf16 with negligible quality loss.
5.2.2 The numerical substrate
- NumPy: the n-dimensional array type that the rest of the Python scientific stack agrees on. Every PyTorch tensor has a one-line conversion to NumPy and back. NumPy 2.x dropped legacy APIs and gained typing improvements, but the surface area you use daily is unchanged from 1.x.
- SciPy: optimization, linear algebra, signal processing, statistics. You mostly reach for
scipy.stats(sampling, distributions) andscipy.sparse(sparse matrices used for classical retrieval) in Part I. - pandas: tabular dataframes for files under roughly 1 GB. The bridge between raw CSV-style data and tensor batches. For larger-than-RAM tabular files, the 2024-26 right answer is polars (Vink, 2020+; Rust-backed dataframe with lazy evaluation that often runs 5-30x faster than pandas on the same workload).
- matplotlib and seaborn: plotting. Use matplotlib for training curves and confusion matrices; seaborn for anything that benefits from grouped statistics.
5.2.3 Classical ML and tokenizers
- scikit-learn: the canonical classical-ML library. Logistic regression, random forests, SVMs, k-means, PCA. Use it for every baseline; if a transformer cannot beat a TF-IDF + logistic regression on your task, the model is not the problem.
- Hugging Face tokenizers: the Rust-backed tokenizer library. Trains a 50k-vocab BPE in seconds on a million documents; the pure-Python alternatives take hours. Covered in depth in Chapter 1.
- Hugging Face datasets: streaming, memory-mapped dataset loader. Handles the awkward step of "this corpus is 200 GB and does not fit in RAM" without you writing custom loaders.
NumPy is fast on CPU, slow off it. PyTorch is fast on GPU, slow on CPU for small tensors. scikit-learn is fast on any CPU dataset that fits in RAM, undefined behaviour above that. Tokenizers are fast in Rust, never roll your own in Python. Each library is fastest in its native context; performance bugs are almost always the result of putting computation in the wrong layer (a NumPy operation inside a training loop, a Python tokenization step inside a DataLoader worker).
Open every notebook in Part I with the same import header (Code Fragment 5.2.1 below), so the patterns become muscle memory. By the time you reach Chapter 12, this same header has grown a from transformers import AutoModel, AutoTokenizer line, but nothing in it has been replaced.
import numpy as np
import torch
import torch.nn as nn
import torch.nn.functional as F
from torch.utils.data import DataLoader, Dataset
import pandas as pd
import matplotlib.pyplot as plt
from sklearn.linear_model import LogisticRegression
from sklearn.preprocessing import StandardScaler
from sklearn.metrics import accuracy_score, classification_report5.2.4 Versions and compatibility
Pin your PyTorch version per-project: torch==2.5.* in a requirements file is enough to avoid the worst version-mismatch surprises (especially with flash-attn and bitsandbytes in later parts). NumPy 2.x is the current line but some research code still expects NumPy 1.26.
If you see AttributeError: module 'numpy' has no attribute 'float' or 'numpy' has no attribute 'int', the cause is NumPy 2 against pre-2024 HF code (roughly 30% of older datasets and torchvision transform paths still expect numpy<2). The fix is uv pip install 'numpy<2' for that project. Pin it once and move on; chasing every shim wastes hours.
Hugging Face Hub: Sharing, Versioning, and Spaces
The Hugging Face Hub is a platform for sharing, discovering, and collaborating on machine learning models, datasets, and applications. It hosts over 800,000 models and 200,000 datasets as of early 2026, making it the largest open ML repository in the world. Beyond storage, the Hub provides Git-based versioning, model cards for documentation, gated access for sensitive models, and Spaces for deploying interactive demos. This section covers how to use the Hub programmatically and through the web interface, from pushing your first model to deploying a production Gradio application.
1. The Hub API: Programmatic Access
The huggingface_hub Python library provides a complete API for interacting with the Hub. You can search for models, download files, upload artifacts, manage repositories, and authenticate, all from Python code or the command line.
The following example demonstrates authentication, searching for models, and downloading specific files.
from huggingface_hub import (
    login,
    HfApi,
    hf_hub_download,
    list_models,
)

# Authenticate (stores token in ~/.cache/huggingface/token)
login(token="hf_YOUR_TOKEN_HERE")
# Or use the CLI: huggingface-cli login

# Initialize the API client
api = HfApi()

# Search for popular text-generation models
models = api.list_models(
    task="text-generation",
    sort="downloads",
    direction=-1,
    limit=5,
)
for m in models:
    print(f"  {m.modelId:<40} downloads: {m.downloads:,}")

# Download a specific file from a model repo
filepath = hf_hub_download(
    repo_id="mistralai/Mistral-7B-v0.3",
    filename="config.json",
)
print(f"Downloaded to: {filepath}")huggingface_hub. The list_models() API filters by task, library, and sort order, while hf_hub_download() fetches individual files to the local cache without downloading the full repository.2. Pushing Models and Datasets to the Hub
Every Hugging Face model or dataset object has a push_to_hub() method that creates a repository (if needed) and uploads the artifacts. Under the hood, the Hub uses Git and Git LFS (Large File Storage) for versioning, so every push creates a commit with a full history.
The following example trains a small model and pushes both the model and tokenizer to the Hub.
from transformers import (
    AutoTokenizer,
    AutoModelForSequenceClassification,
    Trainer,
    TrainingArguments,
)
from datasets import load_dataset

# Train a model (abbreviated; see Section C.3 for full example)
model = AutoModelForSequenceClassification.from_pretrained(
    "distilbert-base-uncased", num_labels=2
)
tokenizer = AutoTokenizer.from_pretrained("distilbert-base-uncased")

# Push model and tokenizer to the Hub
repo_name = "my-username/distilbert-sst2"
model.push_to_hub(repo_name, commit_message="Upload fine-tuned model")
tokenizer.push_to_hub(repo_name, commit_message="Upload tokenizer")

# Push a dataset
dataset = load_dataset("imdb", split="train[:1000]")
dataset.push_to_hub("my-username/imdb-subset")push_to_hub(). Each call creates a Git commit in the Hub repository, providing version history and rollback capability for all artifacts.You can also use the Trainer directly with Hub integration by setting push_to_hub=True in TrainingArguments. The Trainer will push the best checkpoint at the end of training.
from transformers import TrainingArguments
training_args = TrainingArguments(
output_dir="./results",
push_to_hub=True,
hub_model_id="my-username/distilbert-sst2",
hub_strategy="end", # Push at the end of training
# Other options: "every_save", "checkpoint", "all_checkpoints"
)TrainingArguments. The hub_strategy="end" pushes only the final checkpoint; alternatives include pushing at every save or pushing all checkpoints for full experiment reproducibility.3. Model Cards: Documentation and Transparency
Every Hub repository includes a README.md file rendered as the model card. Model cards document a model's intended use, training data, evaluation results, limitations, and biases. Well-written model cards are essential for responsible AI deployment and are increasingly required by organizational policies and regulations.
The huggingface_hub library provides utilities for creating model cards programmatically.
from huggingface_hub import ModelCard, ModelCardData

card_data = ModelCardData(
    language="en",
    license="apache-2.0",
    library_name="transformers",
    tags=["text-classification", "sentiment-analysis"],
    datasets=["glue"],
    metrics=["accuracy", "f1"],
    model_name="DistilBERT SST-2",
    eval_results=[
        {
            "task": {"type": "text-classification", "name": "Sentiment Analysis"},
            "dataset": {"type": "glue", "name": "SST-2"},
            "metrics": [
                {"type": "accuracy", "value": 0.912},
                {"type": "f1", "value": 0.910},
            ],
        }
    ],
)

card = ModelCard.from_template(
    card_data,
    model_id="my-username/distilbert-sst2",
    model_description=(
        "A DistilBERT model fine-tuned on SST-2 for binary sentiment classification. "
        "Trained for 3 epochs with a learning rate of 2e-5."
    ),
    training_procedure="Fine-tuned using HuggingFace Trainer with AdamW optimizer.",
    limitations=(
        "This model was trained on English movie reviews and may not generalize "
        "well to other domains or languages."
    ),
)

# Save locally or push to Hub
card.save("README.md")
card.push_to_hub("my-username/distilbert-sst2")ModelCard.from_template(). The ModelCardData metadata (language, license, tags, eval results) is indexed by the Hub for search and leaderboard display. The template fills in standard sections for description, training, and limitations.The YAML metadata at the top of a model card (the ModelCardData) is indexed by the Hub for search and filtering. Including accurate tags, datasets, metrics, and evaluation results makes your model discoverable and allows the Hub to display evaluation leaderboards, task badges, and compatibility information automatically. Models with complete metadata receive significantly more downloads.
4. Repository Management and Versioning
Hub repositories are Git repositories with LFS support. You can create, clone, branch, and manage them using either the Python API or the Git CLI. This makes it straightforward to version models, roll back to previous checkpoints, and collaborate with teams.
The following example demonstrates repository management operations.
from huggingface_hub import HfApi, create_repo, upload_folder

api = HfApi()

# Create a new model repository
create_repo(
    repo_id="my-username/new-model",
    repo_type="model",       # "model", "dataset", or "space"
    private=False,
    exist_ok=True,           # Don't error if it already exists
)

# Upload an entire directory
upload_folder(
    repo_id="my-username/new-model",
    folder_path="./my-model-files",
    commit_message="Upload model v2 with improved accuracy",
)

# List all commits (version history)
commits = api.list_repo_commits("my-username/new-model")
for commit in commits[:5]:
print(f" {commit.commit_id[:8]} {commit.created_at} {commit.title}")create_repo() initializes a versioned repo, upload_folder() pushes a directory as a single commit, and list_repo_commits() retrieves the full version history for auditing and rollback.# Download a specific revision (commit hash or branch)
from huggingface_hub import snapshot_download
snapshot_download(
repo_id="my-username/new-model",
revision="abc1234", # Specific commit hash
local_dir="./model-v1",
)snapshot_download(). The revision parameter accepts commit hashes or branch names, enabling reproducible model loading from any point in the repository history.5. Gated Models and Access Control
Some models on the Hub require users to accept license terms or provide information before downloading. These "gated" models use the Hub's access request system. Model authors can configure gating through the repository settings, requiring users to agree to terms, provide their intended use case, or be individually approved.
To use gated models programmatically, you must be authenticated and have been granted access.
from transformers import AutoModelForCausalLM, AutoTokenizer

# Gated models require authentication and accepted terms
# First: visit the model page and accept the license
# Then: authenticate with your token

model = AutoModelForCausalLM.from_pretrained(
    "meta-llama/Llama-3.1-8B",          # Gated model
    token="hf_YOUR_TOKEN_HERE",          # Or set HF_TOKEN env var
    torch_dtype="auto",
    device_map="auto",
)
tokenizer = AutoTokenizer.from_pretrained(
    "meta-llama/Llama-3.1-8B",
    token="hf_YOUR_TOKEN_HERE",
)token parameter can be replaced by the HF_TOKEN environment variable for cleaner code.Instead of passing token= to every function call, set the HF_TOKEN environment variable or run huggingface-cli login once. The library checks for tokens in this order: explicit token parameter, HF_TOKEN environment variable, cached token from huggingface-cli login. For CI/CD pipelines, use the environment variable approach.
6. Hugging Face Spaces: Deploying Interactive Demos
Spaces are the Hub's hosting platform for interactive ML applications. You can deploy applications built with Gradio, Streamlit, or static HTML directly from a Git repository. Spaces run on free CPU instances by default, with optional GPU upgrades for inference-heavy applications. They provide an excellent way to share models with non-technical stakeholders or create public demos.
The following example creates a Gradio-based Space for text generation.
# File: app.py (this file goes in your Space repository)
import gradio as gr
from transformers import pipeline

# Load model (cached after first run)
generator = pipeline(
    "text-generation",
    model="gpt2",
    device=-1,   # CPU (use 0 for GPU Spaces)
)

def generate_text(prompt, max_tokens, temperature):
    result = generator(
        prompt,
        max_new_tokens=int(max_tokens),
        temperature=float(temperature),
        do_sample=True,
        num_return_sequences=1,
    )
    return result[0]["generated_text"]

# Build the Gradio interface
demo = gr.Interface(
    fn=generate_text,
    inputs=[
        gr.Textbox(label="Prompt", placeholder="Enter your prompt here..."),
        gr.Slider(10, 200, value=50, step=10, label="Max Tokens"),
        gr.Slider(0.1, 2.0, value=0.7, step=0.1, label="Temperature"),
    ],
    outputs=gr.Textbox(label="Generated Text"),
    title="GPT-2 Text Generator",
    description="Generate text using GPT-2. Adjust temperature for creativity.",
    examples=[
        ["The future of artificial intelligence is", 100, 0.7],
        ["Once upon a time in a land far away,", 150, 1.0],
    ],
)

demo.launch()gr.Interface connects input widgets (textbox, sliders) to the generation function, and examples provides clickable presets. Deploying this as a Space requires only pushing this file to a Hub Space repository.To deploy this as a Space, create a new Space on the Hub and push the app.py file along with a requirements.txt.
# Create and deploy a Space from the command line
from huggingface_hub import create_repo, upload_file

# Create a Gradio Space
create_repo(
    repo_id="my-username/gpt2-demo",
    repo_type="space",
    space_sdk="gradio",        # "gradio", "streamlit", or "static"
    space_hardware="cpu-basic", # Free tier; options include "t4-small", "a10g-small"
)

# Upload the app file
upload_file(
    path_or_fileobj="app.py",
    path_in_repo="app.py",
    repo_id="my-username/gpt2-demo",
    repo_type="space",
)

# Upload requirements
upload_file(
    path_or_fileobj="requirements.txt",
    path_in_repo="requirements.txt",
    repo_id="my-username/gpt2-demo",
    repo_type="space",
)
# The Space will build and deploy automaticallyspace_sdk parameter selects the framework, space_hardware sets the compute tier, and uploaded files trigger an automatic build and deployment on the Hub.Hub organizations let teams share models, datasets, and Spaces under a common namespace (e.g., my-org/model-name). Organization members can have different roles: read, write, or admin. This is useful for corporate teams, research labs, and open-source projects. Organizations can also set default licenses, require model cards, and enforce gating policies across all their repositories.
| Feature | Free Tier | Pro / Enterprise |
|---|---|---|
| Public repositories | Unlimited | Unlimited |
| Private repositories | Unlimited | Unlimited |
| Spaces (CPU) | Free | Free |
| Spaces (GPU) | Not included | T4, A10G, A100 (paid per hour) |
| Inference API | Rate-limited | Dedicated endpoints |
| Storage (Git LFS) | Generous | Higher limits, persistent storage |
| Organization features | Basic | SSO, audit logs, resource groups |
Essential Python Libraries for LLM Work
The LLM ecosystem sits atop a small number of foundational libraries. Knowing what each one does (and does not do) will save you from confusion when you encounter them in code examples throughout this textbook.
Hugging Face Transformers
The transformers library from Hugging Face is the Swiss Army knife of LLM work. It provides a unified API for loading, running, and fine-tuning thousands of pretrained models. Code Fragment G.1.1 below puts this into practice.
# PyTorch implementation
from transformers import AutoModelForCausalLM, AutoTokenizer, pipeline

# Load a model and tokenizer with two lines
model_name = "meta-llama/Llama-3.1-8B-Instruct"
tokenizer = AutoTokenizer.from_pretrained(model_name)
model = AutoModelForCausalLM.from_pretrained(model_name, torch_dtype="auto")

# Or use the high-level pipeline API
generator = pipeline("text-generation", model=model_name)
result = generator("Explain transformers in one sentence:", max_new_tokens=50)
print(result[0]["generated_text"])# PyTorch implementation
import torch
# Check GPU availability
print(f"CUDA available: {torch.cuda.is_available()}")
print(f"Device count: {torch.cuda.device_count()}")
if torch.cuda.is_available():
print(f"GPU name: {torch.cuda.get_device_name(0)}")
print(f"GPU memory: {torch.cuda.get_device_properties(0).total_mem / 1e9:.1f} GB")
# Basic tensor operations
x = torch.randn(3, 768) # 3 vectors of dimension 768
y = torch.randn(768, 512) # weight matrix
z = x @ y # matrix multiplication, shape (3, 512)
# Move tensors to GPU
device = torch.device("cuda" if torch.cuda.is_available() else "cpu")
x = x.to(device)# NumPy computation
import numpy as np
import pandas as pd
# Preparing a fine-tuning dataset from a CSV
df = pd.read_csv("training_data.csv")
df = df.dropna(subset=["instruction", "response"])
df = df[df["response"].str.len() > 10] # filter short responses
# Convert to the format expected by Hugging Face
dataset = df[["instruction", "response"]].to_dict(orient="records")
print(f"Training examples: {len(dataset)}")pipeline API. Two lines load the model; one line generates text.Key classes you will encounter:
AutoTokenizer: Loads the correct tokenizer for any model.AutoModelForCausalLM: Loads decoder-only models (GPT, LLaMA, Mistral).AutoModelForSeq2SeqLM: Loads encoder-decoder models (T5, BART).TrainerandTrainingArguments: High-level fine-tuning API.pipeline: Quick inference for common tasks (text generation, classification, summarization).
PyTorch
PyTorch is the tensor computation framework that powers nearly all modern LLM training and inference. The transformers library is built on top of PyTorch (or optionally JAX/TensorFlow, though PyTorch dominates in practice). Code Fragment G.1.2 below puts this into practice.
NumPy and Pandas
numpy handles numerical arrays on CPU and is used for data preprocessing, metric computation, and quick prototyping. pandas manages tabular data and is indispensable for preparing fine-tuning datasets, analyzing evaluation results, and handling metadata. Code Fragment G.1.3 below puts this into practice.
# pip install datasets
from datasets import load_dataset

ds = load_dataset("imdb", split="train[:100]")
print(ds[0]["text"][:200])
print(f"Features: {ds.features}")# pip install peft
from peft import LoraConfig, get_peft_model
config = LoraConfig(r=16, lora_alpha=32, target_modules=["q_proj", "v_proj"])
peft_model = get_peft_model(model, config)
peft_model.print_trainable_parameters()Additional Libraries
| Library | Purpose | Chapters |
|---|---|---|
datasets |
Efficient dataset loading and processing (Hugging Face) | 12, 13, 14 |
peft |
Parameter-efficient fine-tuning (LoRA, QLoRA) | 14 |
trl |
Transformer Reinforcement Learning (SFT, DPO, Section 20.1) | 16 |
vllm |
High-throughput inference serving | 8 |
langchain |
LLM application framework (chains, agents, RAG) | 19, 21 |
sentence-transformers |
Embedding models for semantic search | 18 |
bitsandbytes |
Quantized model loading (4-bit, 8-bit) | 8, 14 |
wandb |
Experiment tracking and visualization | 25 |
Load and inspect a Hugging Face dataset with streaming for large corpora.
Apply a LoRA adapter to a pretrained model for parameter-efficient fine-tuning.
# Supervised fine-tuning with TRL's SFTTrainer.
# Handles chat-template formatting, packing, and the entire training loop.
from trl import SFTTrainer, SFTConfig
from datasets import load_dataset
from transformers import AutoModelForCausalLM, AutoTokenizer

model_id = "meta-llama/Llama-3.2-1B"
model = AutoModelForCausalLM.from_pretrained(model_id, torch_dtype="bfloat16")
tokenizer = AutoTokenizer.from_pretrained(model_id)

dataset = load_dataset("HuggingFaceH4/ultrachat_200k", split="train_sft[:5000]")

config = SFTConfig(
    output_dir="./sft-llama-3.2-1b",
    max_seq_length=2048,
    per_device_train_batch_size=2,
    gradient_accumulation_steps=8,
    learning_rate=2e-5,
    num_train_epochs=1,
    bf16=True,
    logging_steps=10,
    save_strategy="epoch",
)

trainer = SFTTrainer(
    model=model,
    tokenizer=tokenizer,
    args=config,
    train_dataset=dataset,
    dataset_text_field="messages",  # SFTTrainer reads chat-formatted messages
)
trainer.train()SFTTrainer: the SFTConfig controls sequence length and output directory, while the trainer handles tokenization, loss masking, and checkpointing internally.Set up supervised fine-tuning with the TRL library's SFTTrainer.
# pip install trl
from trl import SFTTrainer, SFTConfig

training_args = SFTConfig(output_dir="./sft_output", max_seq_length=512)
trainer = SFTTrainer(model=model, args=training_args, train_dataset=dataset)
trainer.train()sentence-transformers. The encode() method returns a NumPy array where each row is a fixed-size embedding suitable for cosine similarity search.Generate embeddings for semantic search using a sentence transformer model.
# pip install sentence-transformers
from sentence_transformers import SentenceTransformer

embedder = SentenceTransformer("all-MiniLM-L6-v2")
embeddings = embedder.encode(["How do transformers work?", "Attention is all you need."])
print(f"Embedding shape: {embeddings.shape}")Experiment-tracking libraries (W&B, MLflow) get full treatment in Section 19.11 (Libraries & Frameworks). The wandb row in the table above is included only so you recognize the package when you see it imported; the canonical wandb.init() / wandb.log() / wandb.finish() recipe lives in Section 19.11 (Libraries & Frameworks).
Build a simple LLM chain with LangChain for prompt templating and invocation.
# pip install langchain langchain-openai
from langchain_openai import ChatOpenAI
from langchain_core.prompts import ChatPromptTemplate

llm = ChatOpenAI(model="gpt-4o-mini")
prompt = ChatPromptTemplate.from_template("Summarize: {text}")
chain = prompt | llm
result = chain.invoke({"text": "LLMs use transformers to process text."})
print(result.content)What's Next?
In the next section, Section 5.3: Scripting Patterns & Environment Setup, we move from cataloging libraries to using them: common LLM scripting patterns (device mapping, generation, batching), linking CUDA to PyTorch, installing key libraries, and verifying your setup.