"Platform" in Part I means three different things stacked on top of each other: the hardware you compute on, the runtime that schedules work on that hardware, and the notebook environment that hosts the code you write. The choices you make here set the ceiling on what experiments you can run on a Tuesday afternoon and the floor on how much you spend before you have learned anything.
The good news is that the entire stack for Part I fits inside a free tier. Every exercise in this part can be done on a consumer laptop, on Google Colab's free GPU, or on Kaggle's free GPU; none of the foundational experiments require renting a frontier accelerator. The bad news is that you have to learn which platform fits which task, because the answer is not "always the biggest GPU you can find".
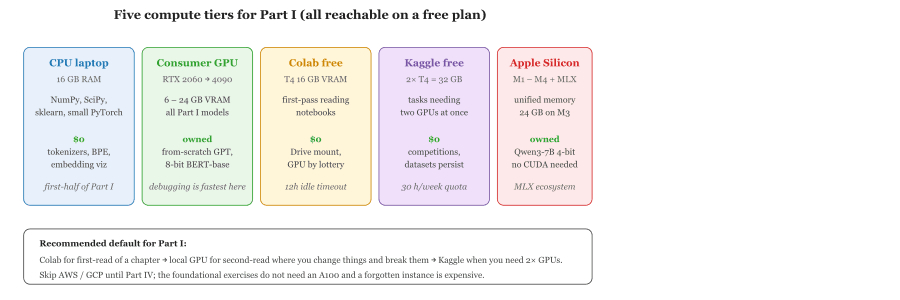
5.1.1 Hardware tiers you will encounter
Three hardware tiers cover the foundational curriculum. The first is the CPU laptop: any modern machine with 16 GB of RAM runs the NumPy / SciPy / scikit-learn exercises and the smaller PyTorch examples in seconds. The second is the consumer GPU: an NVIDIA RTX 2060 (6 GB) through RTX 4090 (24 GB) handles every model in Part I, including a from-scratch transformer trained on a small corpus, and fits an 8-bit quantized BERT-base for inference. The third is the cloud accelerator: Google Colab hands out free T4s, Kaggle hands out free P100s and T4 x2 sessions, and Lightning Studios offers a free monthly GPU credit.
5.1.2 The hosted notebook tier
Even if you own a GPU, you will start in a hosted notebook for a simple reason: the cost of a misconfigured CUDA install is several wasted evenings, and the marginal cost of opening Colab is zero. The three notebooks worth knowing:
- Google Colab: the canonical free-tier GPU notebook. Free T4 (16 GB VRAM), Pro tier adds A100 / L4 access. Mounts Google Drive directly.
- Kaggle Notebooks: free dual-T4 sessions (32 GB VRAM combined), persistent datasets, integrates with Kaggle competitions.
- Lightning Studios: free monthly GPU credits with a VS Code experience instead of a Jupyter UI; the right pick if you prefer terminal-driven workflows.
5.1.3 The local stack
Local development matters even when you train on cloud GPUs, because debugging is faster on a machine where you control everything. For Part I, install Python 3.14 via uv (Astral, 2024; 10-100x faster than pip and the default modern installer) or conda / pixi (Prefix.dev, 2024) when CUDA wheel pinning matters. The canonical one-liner is uv venv && uv pip install torch transformers. After that, install PyTorch with the matching CUDA build for your GPU. The --index-url trick on the PyTorch install page picks the right CUDA / ROCm wheel automatically. VS Code with the Python and Jupyter extensions is the de facto IDE; PyCharm remains popular among those who prefer a richer debugger.
On Apple Silicon (M1 through M4), the modern path is MLX (Apple, 2023) plus a 4-bit quantized model from MLX Community on Hugging Face: a base M3 with 24 GB unified memory now runs Qwen3-7B locally without a CUDA toolchain. For learners on Mac, this is faster end-to-end than fighting CUDA on a desktop with a marginal GPU.
Two additional notebook tiers are worth flagging beyond Colab and Kaggle. Modal Notebooks (Modal Labs, 2024) attach a persistent Volume to a serverless GPU, so files survive between sessions. Hugging Face Spaces ZeroGPU (2024) hands out an A10G for short-lived experiments at no cost when the Space is being used.
Roughly half of "the model is not training" debugging time in Part I is non-determinism, not capacity. Set torch.manual_seed(0), numpy.random.seed(0), and (if you use a DataLoader) pass a generator with a fixed seed. If the training curve still looks wrong, then think about hardware. PyTorch's randomness notes list every knob.
Colab and Kaggle both wipe your filesystem on session end. Save checkpoints to Drive (Colab), to a Kaggle Dataset (Kaggle), or to S3 (anything else). If a 4-hour training run vanishes because you let the runtime time out, the lesson is cheap but the time is not.
5.1.4 Choosing a default
For everything in Part I, the recommended default is: Google Colab for the first read-through of a chapter, your own laptop (with or without GPU) for the second read-through where you change things and break them, and Kaggle when you need two GPUs at once. Skip the major cloud providers until Part IV; the foundational exercises do not need an A100 and the cost of accidentally leaving one running is too high to risk while you are learning.
Colab assigns GPUs by lottery (T4, L4, A100 with shrinking probability as you climb), and the assigned hardware can change mid-session if the runtime restarts. Run torch.cuda.get_device_name() at the top of every notebook and re-tune batch size accordingly. The Feb 2025 Colab quota tightening (idle TPU sessions dropped from 12 h to 3 h) made cloud free tiers further unsuitable as long-running checkpoint hosts. See Section 10.6 for the larger hardware-tier ladder used in Parts II+; this section's 6 / 12 / 24 GB rungs are a subset.
Virtual Environments and Dependency Management
LLM libraries have complex dependency trees, and version conflicts are a daily reality. Isolating each project in its own virtual environment is not optional; it is essential for reproducibility and sanity. Code Fragment G.2.1 below puts this into practice.
Option 1: venv (Built-in)
This snippet shows how to create and activate a virtual environment using Python's built-in venv module.
# Create a virtual environment
python -m venv llm-env

# Activate it
# On Linux/macOS:
source llm-env/bin/activate
# On Windows:
llm-env\Scripts\activate

# Install packages
pip install torch transformers datasets accelerate

# Freeze dependencies for reproducibility
pip freeze > requirements.txt

# Recreate environment elsewhere
pip install -r requirements.txtvenv. The pip freeze command captures exact package versions for reproducibility, and requirements.txt can recreate the environment on any machine.Option 2: Conda (Recommended for GPU Work)
This snippet shows how to set up a Conda environment with GPU support for LLM projects.
# Create an environment with a specific Python version
conda create -n llm-project python=3.11
conda activate llm-project

# Install PyTorch with CUDA support (conda handles CUDA toolkit)
conda install pytorch torchvision torchaudio pytorch-cuda=12.4 -c pytorch -c nvidia

# Install Hugging Face libraries via pip (within conda env)
pip install transformers datasets peft trl

# Export environment
conda env export > environment.yml
# Install uv
pip install uv
# Create a virtual environment and install packages
uv venv llm-env
source llm-env/bin/activate
uv pip install torch transformers datasetsThe main advantage of Conda over venv for LLM work is CUDA management. Installing PyTorch with conda automatically includes the correct CUDA toolkit version, sidestepping the need to install system-level NVIDIA drivers and CUDA separately. This is especially valuable on shared machines or when you need different CUDA versions for different projects.
Option 3: uv (Fast Alternative)
uv is a modern, Rust-based package manager that is dramatically faster than pip. It is gaining traction in the ML community for its speed and compatibility. Code Fragment G.2.3 below puts this into practice.
# Create a virtual environment with uv (Rust-based, ~10x faster than pip)
# uv resolves and installs hundreds of packages in seconds.
# Install uv itself first:
curl -LsSf https://astral.sh/uv/install.sh | sh

# Then create + activate the venv
uv venv llm-env
source llm-env/bin/activate   # Linux/macOS
# llm-env\Scripts\activate    # Windows

# Install dependencies (uv reads pyproject.toml or requirements.txt)
uv pip install torch transformers datasets accelerateuv, a Rust-based package manager that resolves and installs dependencies significantly faster than pip.Jupyter Notebooks and Google Colab
Notebooks are the preferred environment for exploration, prototyping, and learning. They let you run code cell by cell, inspect intermediate results, and mix code with documentation. Nearly every LLM tutorial and research artifact is published as a notebook. Code Fragment G.3.1 below puts this into practice.
Local Jupyter Setup
This snippet shows how to install and launch Jupyter for local notebook development.
# Install Jupyter in your virtual environment
pip install jupyterlab

# Launch the notebook server
jupyter lab

# Or use the classic interface
jupyter notebookGoogle Colab Tips
- Free GPU access: Go to Runtime > Change runtime type > select T4 GPU. The free tier gives you a T4 with 15 GB VRAM, enough to run 7B parameter models in 4-bit quantization.
- Mounting Google Drive: Use
from google.colab import drive; drive.mount('/content/drive')to access your files and save checkpoints persistently. - Installing packages: Use
!pip install transformers peft trlat the top of your notebook. The exclamation mark runs shell commands from within a notebook cell. - Secrets management: Use Colab's Secrets panel (the key icon in the left sidebar) to store API keys instead of hardcoding them in cells.
- Session limits: Free Colab sessions disconnect after idle periods and have usage quotas. Save checkpoints frequently to Google Drive.
Notebooks allow out-of-order cell execution, which can lead to hidden state bugs: a variable defined in cell 10 might be used in cell 3 after you reorder things. Before sharing a notebook, always restart the kernel and run all cells sequentially to verify that the notebook works from a clean state. For production code, always refactor notebooks into proper Python modules.
Hardware Requirements for LLM Work
Large language models earn their name. Even "small" open models have billions of parameters, and each parameter requires memory. Understanding hardware requirements before you begin will save you from frustrating out-of-memory errors.
GPU (Graphics Processing Unit)
A GPU is the most important piece of hardware for LLM work. NVIDIA GPUs with CUDA support are the standard; AMD and Intel GPUs have improving support but lag in ecosystem maturity.
| Task | Minimum VRAM | Recommended GPU |
|---|---|---|
| Inference (7B model, 4-bit) | 6 GB | RTX 3060 12GB, RTX 4060 Ti |
| Inference (7B model, 16-bit) | 14 GB | RTX 4090 24GB, A5000 |
| Inference (70B model, 4-bit) | 40 GB | A100 80GB, 2x RTX 4090 |
| Fine-tuning (7B, LoRA, 4-bit) | 12 GB | RTX 4070 Ti, T4 (Colab free) |
| Fine-tuning (7B, full) | 40+ GB | A100 80GB |
| Pretraining | Hundreds of GB | Multi-node A100/H100 clusters |
The parameter count of a model multiplied by the bytes per parameter gives you the minimum VRAM needed. A 7B parameter model in float16 (2 bytes per parameter) requires about 14 GB just for the weights. During training, optimizer states and gradients can triple this requirement. Quantization (loading in 4-bit or 8-bit precision) is the most practical way to fit larger models into smaller GPUs.
RAM (System Memory)
You need sufficient system RAM to load model weights before transferring them to the GPU. A general rule: have at least as much system RAM as GPU VRAM, plus extra for your dataset and operating system. For most setups, 32 GB of system RAM is comfortable; 16 GB is workable but tight.
Disk Space
Model weights are large files. A 7B parameter model typically occupies 13 to 14 GB on disk in float16, or about 4 GB in 4-bit quantized GGUF format. If you plan to download several models, allocate at least 100 GB of free disk space. SSDs are strongly preferred over HDDs for loading speed.
By default, the transformers library caches downloaded models in ~/.cache/huggingface/hub/. This directory can grow to tens or hundreds of gigabytes. To move it to a larger drive, set the environment variable HF_HOME=/path/to/your/cache before running any code. You can also use huggingface-cli scan-cache to see what is cached and huggingface-cli delete-cache to clean up.
CUDA and Driver Setup
CUDA is NVIDIA's parallel computing platform, and it is required for GPU-accelerated deep learning. Getting the right combination of driver version, CUDA toolkit version, and PyTorch version is one of the trickiest parts of setup.
Step 1: Install the NVIDIA Driver
Download the latest driver for your GPU from the NVIDIA Driver Downloads page. On Linux, you can also install via your package manager: Code Fragment H.2.1 below puts this into practice.
# Ubuntu/Debian
sudo apt update
sudo apt install nvidia-driver-550

# Verify installation
nvidia-smi
# Verify CUDA installation
nvcc --version
# Check that PyTorch sees CUDA
python -c "import torch; print(torch.cuda.is_available())"nvidia-smi.The nvidia-smi command should display your GPU name, driver version, and the maximum CUDA version your driver supports.
Step 2: Install CUDA Toolkit (Optional if Using Conda)
If you install PyTorch via Conda, the CUDA toolkit is bundled automatically (see Section H.3). If you prefer a system-wide CUDA installation, download it from the NVIDIA CUDA Toolkit page. Code Fragment H.2.2 below puts this into practice.
# Verify the CUDA toolkit version and confirm PyTorch detects the GPU.
# nvcc is the CUDA compiler driver; its version must match the PyTorch build.
nvcc --version
# This one-liner imports PyTorch and prints True if a CUDA GPU is available
python -c "import torch; print(torch.cuda.is_available())"The NVIDIA driver, CUDA toolkit, and PyTorch must be compatible. PyTorch 2.5+ requires CUDA 12.1 or 12.4. If torch.cuda.is_available() returns False, the most common cause is a version mismatch. Check the PyTorch installation page for the correct command that matches your CUDA version.
Cloud Compute Options
Not everyone has a beefy GPU at home. Cloud platforms offer GPU access at various price points, from free to enterprise-grade. Here is a comparison of popular options.
| Platform | GPU Options | Price Range | Best For |
|---|---|---|---|
| Google Colab | T4 (free), A100 (Pro) | Free to $50/mo | Learning, quick experiments |
| Lambda Cloud | A100, H100 | $1.10+/hr per GPU | Training, extended jobs |
| RunPod | A100, H100, RTX 4090 | $0.40+/hr | Flexible on-demand GPU |
| AWS (SageMaker) | A10G, A100, P5 (H100) | $1+/hr | Enterprise, production |
| Google Cloud (Vertex AI) | T4, A100, TPU v5 | $0.35+/hr | Enterprise, TPU workloads |
| Modal | A100, H100 | Pay per second | Serverless GPU functions |
| Vast.ai | Various consumer and datacenter GPUs | $0.10+/hr | Budget GPU rentals |
For following along with this textbook, start with Google Colab (free T4 GPU). It can run 7B models in 4-bit quantization and handle LoRA fine-tuning. When you need more power or longer sessions, move to RunPod or Lambda for on-demand A100 access. Reserve enterprise cloud platforms (AWS, GCP) for production deployments where you need managed services, SLAs, and team collaboration features.
Google Colab Quick Start
This snippet installs the required packages in a Google Colab notebook and verifies GPU availability.
# First cell: install libraries
!pip install -q transformers peft trl bitsandbytes accelerate datasets
# Second cell: check GPU
!nvidia-smi
# Third cell: mount Google Drive for persistent storage
from google.colab import drive
drive.mount('/content/drive')
# Fourth cell: set your Hugging Face token
from google.colab import userdata
hf_token = userdata.get('HF_TOKEN') # stored in Colab SecretsIDE Setup and Editor Integrations
Once your CUDA stack and Python libraries are in place (sections I.2 through I.5), the next decision is which editor you will live inside. The choice determines how productive you are with the workflows LLM engineering imposes: notebook-plus-script hybrid development, remote GPU instances, type-checked autocompletion against Hugging Face and PyTorch, and AI-in-IDE assistants that have become table stakes.
This section covers the four editors that dominate as of 2026: VS Code (default), Cursor (AI-first fork), PyCharm (heavy refactoring), Neovim (keyboard-driven). Deep AI-in-IDE coverage is in Chapter 50.2 (Vibe-Coding); this section is the configuration counterpart. Notebook UX is in Section 5.2 (Libraries & Frameworks); API-key handling for AI assistants is in Section 14.1 (Platforms).
Four editors handle 95% of LLM engineering. VS Code is the default for almost everyone. Cursor is the AI-first fork that moved fastest on agent-in-IDE integration. PyCharm fits projects with serious refactoring needs or JetBrains habits. Neovim fits terminal natives with a Lua config. All four edit notebooks, attach to remote GPUs, and run AI assistants; they differ in defaults and polish.
1. VS Code: The Default
VS Code (Microsoft, free, MIT-licensed core) is the most common editor for Python and LLM work as of 2026: ~70% of Stack Overflow's Python respondents use it. Defaults are good; the extension ecosystem is the largest; remote development (SSH, containers, WSL, Codespaces) works without configuration.
Python (Microsoft) provides interpreter selection, virtual-env detection, debugger, and test runner. Pylance powers type-checked autocompletion against Hugging Face Transformers, PyTorch, LangChain stubs (which landed across 2024). Set "python.analysis.typeCheckingMode": "basic" in .vscode/settings.json. Jupyter provides notebook UI with kernel selection, variable explorer, and cell debugger; with %load_ext autoreload you iterate on library code and re-run cells without kernel restart.
Ruff (Astral, Rust) is the 2025 consensus formatter/linter, 10-100x faster than flake8 + black + isort. Configure via pyproject.toml. GitLens adds inline blame and richer diffs, useful for tracing why a hyperparameter changed three commits ago when an eval regresses.
AI-in-IDE options: GitHub Copilot (paid, most polished), Continue (open source, BYO-model), Cody (Sourcegraph, code-search-aware), Codeium (free tier). All four are VS Code extensions; the deep comparison is in Chapter 50.2.
// .vscode/settings.json for LLM engineering
{
  "python.analysis.typeCheckingMode": "basic",
  "python.analysis.diagnosticMode": "workspace",
  "[python]": {
    "editor.defaultFormatter": "charliermarsh.ruff",
    "editor.formatOnSave": true,
    "editor.codeActionsOnSave": {"source.fixAll.ruff": "explicit"}
  },
  "jupyter.askForKernelRestart": false,
  "notebook.output.textLineLimit": 200,
  "files.exclude": {"**/__pycache__": true, "**/.ipynb_checkpoints": true},
  "git.autofetch": true
}For teams sharing a codebase, commit a .devcontainer/devcontainer.json pinning Python version, CUDA base image, extensions, and post-create commands. New members clone, open in VS Code or Codespaces, and the entire environment rebuilds identically. The 2024-2025 Hugging Face example repos (transformers, peft, trl) ship devcontainers; pattern after them.
2. Cursor: VS Code with Native AI
Cursor (Anysphere, freemium) is a VS Code fork integrating AI directly rather than via extension. Differences from VS Code + Copilot: multi-file edits (Cmd-K across N files), Composer (agent mode for multi-step changes), codebase chat against embedded code search, and tab completion with more code context. Supports hosted models and BYO-API-key for Claude / GPT / others.
Trade-off: closed-source vs VS Code's MIT core; you depend on Anysphere's cadence. Most VS Code extensions work in Cursor. 2025 production usage at AI-native companies (Vercel, Replit, Perplexity) is driven by Composer for multi-file refactors.
3. PyCharm: The Heavy IDE
PyCharm (JetBrains; Pro and Community editions) fits two situations: large refactoring projects where cross-file rename / inspection matter, and teams already in the JetBrains ecosystem. Scientific Mode (Pro only) provides tensor inspection and a plotting pane. JetBrains AI Assistant (paid) and the 2025 Junie agent provide a Copilot-comparable experience with deeper refactoring-engine integration.
Strongest feature: the remote interpreter. Point a remote SSH interpreter at a RunPod or Lambda GPU; the IDE runs code there with full debugger, profiler, and Scientific Mode while you edit locally. Heavier setup than VS Code Remote-SSH, but more cohesive for week-long fine-tuning projects.
4. Neovim: The Terminal Native
Neovim with LSP fits terminal natives with a Lua config. The 2024-2025 ecosystem matured: nvim-jupyter and jupytext for notebooks, nvim-dap for debugpy, copilot.lua and codecompanion.nvim for AI. Trade-off: configuration complexity in exchange for an editor that does exactly what you want over any SSH session.
5. Comparison: Which to Pick
| Editor | Best For | AI Integration | Notebook UX | Remote Dev | License |
|---|---|---|---|---|---|
| VS Code | Default; nearly everyone | Copilot, Continue, Cody, Codeium (ext) | Strong | Strong (Remote-SSH, Codespaces, WSL) | MIT core |
| Cursor | Heavy AI users; multi-file edits | Native (Composer, Cmd-K, tab) | Inherited from VS Code | Strong (inherited) | Closed-source (free tier) |
| PyCharm | Big refactors; JetBrains shops | JetBrains AI / Junie (paid) | Strong (Pro only) | Strong (Pro: full remote interpreter) | Apache 2.0 (Community) / Pro paid |
| Neovim | Terminal natives; keyboard-driven | copilot.lua, codecompanion (ext) | Moderate (nvim-jupyter, jupytext) | Native (it is a terminal app) | VIM license |
6. Recommended Starter Setup
For 90% of readers, the recommended setup is:
- Install VS Code (or Cursor if committing to AI-first from day one; switching later is easy).
- Install Python, Pylance, Jupyter, Ruff, and GitLens extensions.
- Pick one AI assistant: Copilot (paid), Continue (free, BYO-model), or Cursor's native AI.
- Drop the
.vscode/settings.jsonabove into your project. - For remote GPU work, install Remote-SSH and verify you can open a folder on the remote machine.
A typical configured workspace: editor pane shows a Python file with type-checked autocompletion against the Hugging Face stack; notebook pane hosts a kernel where you iterate on training loops; bottom terminal runs nvidia-smi against the remote instance; an AI-assistant chat docks on the right. The whole thing is reproducible because .vscode/settings.json and .devcontainer/devcontainer.json are in Git.
%load_ext autoreload followed by %autoreload 2 reloads imported modules on every cell execution; this is what makes the notebook-plus-script workflow ergonomic. %env CUDA_VISIBLE_DEVICES=0 pins the GPU when you have multiple cards (and the GPU-management discipline from the global instructions applies: only one GPU job at a time on a single-card workstation).
7. AI-in-IDE Configuration Hygiene
AI assistants read your code, file paths, sometimes terminal output, and send them to a remote API. For LLM engineering this matters more than for typical Python work because your source tree contains proprietary prompts, embeddings, and eval-set examples. Three defenses: (1) configure workspace exclusions for data/, secrets/, anything with API keys; (2) use enterprise / business tiers (Copilot Business, Cursor Business) which disable training-on-your-code by default; (3) verify the assistant respects .gitignore.
- Section 5.2 (Libraries & Frameworks) for Jupyter Notebooks and Google Colab notebook UX.
- Section 14.1 (Platforms) for API-key handling that prevents leaks when AI assistants are active in your IDE.
- Part XIV (Designing LLM/Agent Products) for the deep dive on AI-in-IDE workflows.
- Section 5.1 (Platforms) and Section 5.2 (Libraries & Frameworks) for the CUDA toolchain that all of these editors talk to.
- VS Code with Python, Pylance, Jupyter, Ruff, and GitLens is the right starter for ~90% of LLM engineers. Add one AI assistant (Copilot, Continue, Cody, Codeium) and you have the working configuration.
- Cursor is the AI-first VS Code fork. Pick it if multi-file edits and agent refactors are central; extension ecosystem is mostly compatible.
- PyCharm Pro fits heavy refactoring and JetBrains shops; Scientific Mode and full remote interpreters are the differentiators.
- Neovim fits terminal natives. The 2024-2025 LSP and Jupyter ecosystem make it viable, but the configuration cost is real.
- Commit
.vscode/settings.jsonand.devcontainer/devcontainer.jsonto your repo. Configure AI assistants to skip data and secrets directories before pointing them at the codebase.
What Comes Next
Continue to Section 14.1 (Platforms) to lock down your OpenAI, Anthropic, and Hugging Face credentials before you start writing inference scripts.